If you have created a website on the Blogger platform where you share
movie-related content and you needed a download button so that you could add
a torrent link to it, you cannot easily do it on your Blogger theme but you
can do this with some code to create a stylish and beautiful torrent
download button, and then you can add it with your Blogger theme.
You can quickly add a stylish-looking torrent download button to your
blogger theme by using the code I'm about to share with you. To do that,
just follow the steps listed below.
Step 1
First of all, copy the CSS code from below and paste it into your blogger
theme once because it's a one-time process. To do this, go to your blogger
dashboard, click on the "Theme" option and then click on the
"Customize" option.
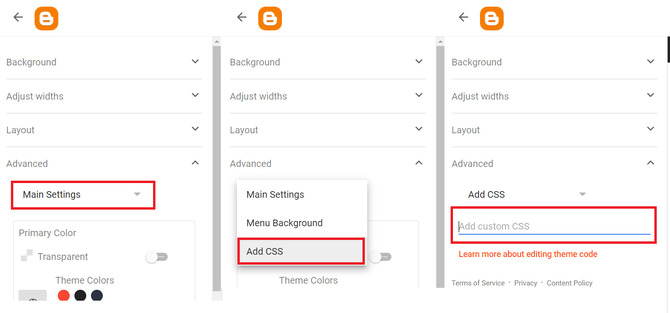
Step 2
After clicking on the "Customize" option, you'll find the
"Advanced" setting option here. You must choose the option to "Add CSS" from the drop-down option, paste the copied code here, and then save it
in order for the changes you make to take effect with the theme.
Step 3
Now, copy the HTML code from below and paste it where you want to put a
torrent download button in your blog post. However, because the code below
is in HTML format, you must paste it in the "HTML view" section, not
in the "Compose View" section of the blog post. After selecting the
HTML or Compose View option while generating a post, you can easily change
the view style just simply selecting the option in the top left corner of
the page (see image).
HTML and CSS code for Creating Torrent Download Button in any Blogger theme
- Here is CSS Code -
      .navi-torrent-box {
          overflow: hidden;
          margin: 20px 0px;
          background-color: #eee;
          border-radius: 5px;

      }

      .navi-box-title {
          padding: 20px 15px;
          border-bottom: 1px solid #cfcfcf;
          font-weight: bold;

      }

      .navi-btn-area {
          display: flex;
          flex-wrap: wrap;
          justify-content: center;
          align-items: center;
          margin: 10px;

      }

      .navi-btn-link {
          background-color: chocolate;
          color: #fff;
          padding: 4px 16px;
          margin: 0.5rem;
          border-radius: 5px;
          text-align: center;
          font-size: .85rem;

      }

      @media (max-width:769px) {
          .navi-btn-link {
              width: 100%
          }
      }
-Here is HTML Code-
 <div class="navi-torrent-box">

        <div class="navi-box-title">
            <i class="fas fa-cloud-download-alt" style="color:chocolate;"></i>  Download Torrents
        </div>
        <div class="navi-btn-area">

            <a href="#" class="navi-btn-link">
                <i class="fas fa-magnet fa-rotate-180"></i> GET
                TORRENT   1.9GB   1080p   MKV</a>

            <a href="#" class="navi-btn-link">
                <i class="fas fa-magnet fa-rotate-180"></i> GET
                TORRENT   1GB   720p   MKV</a>

            <a href="#" class="navi-btn-link">
                   <i class="fas fa-magnet fa-rotate-180"></i> GET
                TORRENT   700MB   320p   MKV</a>

            <a href="#" class="navi-btn-link">
                <i class="fas fa-magnet fa-rotate-180"></i> GET
                TORRENT   400MB   320p   MKV</a>

            <a href="#" class="navi-btn-link">
                <i class="fas fa-magnet fa-rotate-180"></i> GET
                TORRENT   250MB   240p   MKV</a>

        </div>
    </div>
Note : In the ancher tag (<a href="#" >) replace hash (#) with proper link which you want to put for on click action.
Output of the Code
If the icon of the torrent download button does not show properly then must
use this new Font awesome CDN link. Simply add this link in the <head>
tag of your theme and done.
<link rel="stylesheet" href="https://cdnjs.cloudflare.com/ajax/libs/font-awesome/6.2.0/css/all.min.css" crossorigin="anonymous" referrerpolicy="no-referrer" />


No comments:
Post a Comment
What do you think about this article? just write your feedback in the comment box. Thanks :)